
Did you know you can now carry out tasks in your other business tools, right from inside OnePageCRM, and with one click?
Custom Buttons make this possible.
You set up a button once, and whenever you click it, the task starts in the other app with the customer's details already filled in.
In this post, you'll see eight tasks you can automate using our Custom Buttons feature.

What are Custom Buttons?
Custom Buttons are buttons you make yourself and add to your contacts and deals in OnePageCRM. Each one connects to another app, and clicking it can open that app and/or carry out a task inside it.
To do that, a Custom Button uses the fields on the contact or deal you're on. That can be the customer's name, email address, deal value, and more.
8 tasks you can automate with a Custom Button
1. Look up a lead before you get in touch
Looking up a new lead before reaching out to them can take a few searches. You can use ChatGPT or another AI assistant to do that research for you. When you click it, a new tab opens, and the assistant starts researching that contact and their company straight away.
Want to set up this Custom Button for yourself?
Add a Contact button with this address:
https://chatgpt.com/?q=Research this person and business: [contact.fullname] of [organization.name]Pro tip: Swap out the words before the colon to change the task you want the button to perform. For example, you can put in "Find recent news about" if that's what you'd rather look for. ChatGPT submits the prompt and starts working on its own, even if you're not signed in.
2. Get directions to a customer
If you visit customers in person, this button shows you how to get to them from your current location. When you click it, Google Maps opens with directions to the address saved on that contact.
Want to set up this Custom Button for yourself?
Add a Contact Custom Button with this address:
https://www.google.com/maps/dir/?api=1&destination=[contact.address]3. Send a calendar invite with the contact already added
Once you've agreed on a time to meet, the invite still has to be typed up. This button opens a new event in your Google Calendar, with the title filled in and the contact already added as a guest. You pick the time, send it, and the invite goes to their inbox.
This works with Outlook as well. If that's your calendar, use the Outlook address in the setup below instead of the Google one. When you click the button, a new event opens in Outlook with the title and the contact filled in, the same as in Google Calendar.
Want to set up this Custom Button for yourself?
Add a Contact button with one of these two addresses.
If you use Google Calendar:
https://calendar.google.com/calendar/render?action=TEMPLATE&text=[contact.fullname] - [organization.name]&add=[contact.email]If you use Outlook:
https://outlook.office.com/calendar/deeplink/compose?subject=[contact.fullname] - [organization.name]&to=[contact.email]On a personal Outlook account, swap outlook.office.com at the start for outlook.live.com. Everything after it stays the same.
4. Email a PayPal payment link for the deal amount
When it's time to collect payment on a deal, this button triggers an email the customer a PayPal payment link set to the deal's amount. The email goes from your own email account, and you'll see a CRM note on the contact saying it was sent.
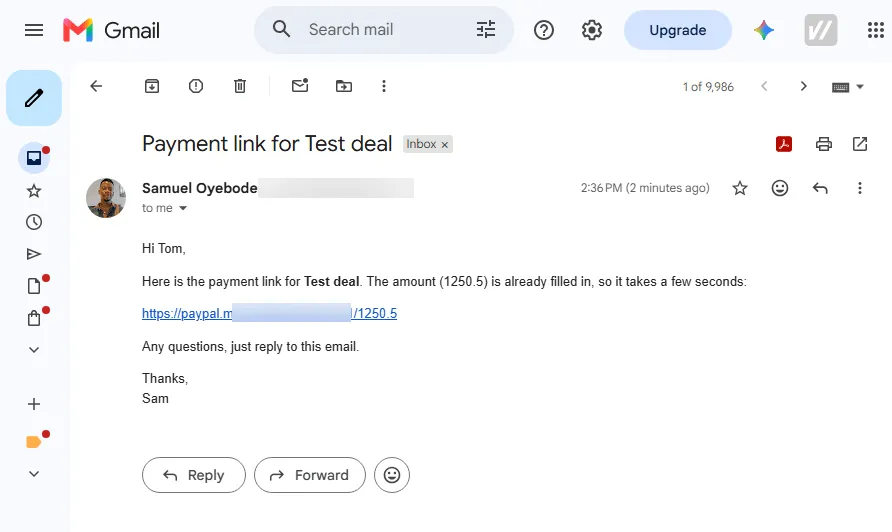
Want to set up this Custom Button for yourself?
First, copy our Make template into your own Make account. In the Gmail step, put your PayPal.Me name where it says "YOURNAME", and your own name where it says "[your name]". Then connect your Gmail and OnePageCRM accounts.
Next, click the first step in the template, then click Add to get your webhook address. In OnePageCRM, add a Deal button and paste that address as its link. Then add this to the end of it:
?id=[contact.id]&name=[contact.firstname]&fullname=[contact.fullname]&email=[contact.email]&company=[organization.name]&deal=[deal.name]&amount=[deal.amount]5. Email a Stripe checkout link
If your customers pay you through Stripe, this button emails them your Stripe checkout link. When they open it, their email address is already filled in on the payment page. A note also goes on the contact, so you can see the link was sent.
Want to set up this Custom Button for yourself?
Copy the Stripe template into your Make account, then open its Gmail step. Put your Stripe checkout link in place of "YOUR_STRIPE_PAYMENT_LINK", and your name in place of "[your name]".
After that, connect your Gmail and OnePageCRM accounts. Then click the first step, click Add, and copy the webhook address Make creates. That address, with the ending below added on, is the link for a Contact button in OnePageCRM:
?id=[contact.id]&name=[contact.firstname]&fullname=[contact.fullname]&email=[contact.email]&company=[organization.name]6. Get the contract signed
When a customer says yes to a deal, they need a contract to sign. This button sends them your DocuSign contract by email, with their name and email address already filled in. A note also goes on the contact, so you can see it was sent.
Want to set up this Custom Button for yourself?
Open the DocuSign template and copy it. In the DocuSign step, you'll see "YOUR_DOCUSIGN_TEMPLATE_ID". Replace it with the ID of the contract template you'd like to send out.
In your DocuSign template, the person signing has a role name. Ours is called "Client", and the DocuSign step in the Make template is set to that. If your role has a different name, click that step and type your role's name into the "Role Name" box in place of "Client".
Connect your DocuSign and OnePageCRM accounts, click the first step, and select Add to create your webhook. Go back to OnePageCRM, add a Deal button, and type in your webhook address with this at the end:
?id=[contact.id]&name=[contact.fullname]&email=[contact.email]&company=[organization.name]&deal=[deal.name]&amount=[deal.amount]7. Pass a won deal to whoever delivers it
If the delivery of your product or service is handled by someone else, they'll need to know what was sold and to whom. This button sends a summary to your Slack channel with the company, the contact, the deal, and its amount. It also puts a Next Action on the contact, so the team member taking over knows what to do first.
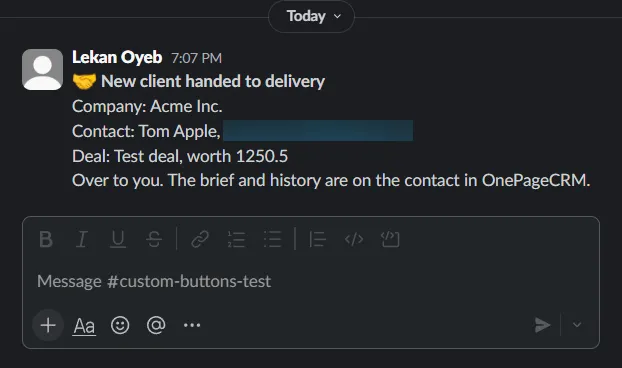
Want to set up this Custom Button for yourself?
Copy the Slack template. In its Slack step, replace "#delivery" with the name of the channel where you want the summary to go. Then connect your Slack and OnePageCRM accounts.
Next, click the first step in the template and click Add. Make creates a webhook address for you, so copy it. Back in OnePageCRM, add a Deal button, paste the address in as its link, and add this to the end:
?id=[contact.id]&name=[contact.fullname]&email=[contact.email]&company=[organization.name]&deal=[deal.name]&amount=[deal.amount]8. Send a customer a text
This button lets you send customers a text message from inside their profile. The text is sent from your business number and includes the customer's name. OnePageCRM also adds a note to the customer's profile, saying you sent a text.
There are a few things to keep in mind, though:
- The texts are sent through Twilio, so you'll need a Twilio account.
- Twilio's free trial only lets you send their own ready-made messages. So, you'll need to pay for a phone number.
- If you're in the US, you'll need to complete a one-time registration to use business texting via Twilio.
Want to set up this Custom Button for yourself?
Copy the Twilio template and open its Twilio step. Put your Twilio number in place of "YOUR_TWILIO_NUMBER". The message is in that step too, so either write your own or keep ours and fill in "[your name]" and "[your company]".
Connect Twilio and OnePageCRM, then click the first step and click Add to get your webhook address. The button for this one goes on contacts, and its link is that address with this ending:
?id=[contact.id]&phone=[contact.phone]&firstname=[contact.firstname]Start using Custom Buttons today
Custom Buttons let you start tasks in your other apps without having to leave OnePageCRM. You only need to set up each button once, and from then on, you can use it on any of your contacts or deals.
Custom Buttons are ready in your account now. Add the first one from Settings, or start a free trial if you're new to OnePageCRM.